Want to Build a Bartop Arcade?

So did I! This website is a write-up of building my very own awesome RetroPie-powered bartop arcade machine, with parts list, photo gallery, useful links to amazing resources and video tutorials I found invaluable.

I hope this web page helps you to build your bartop arcade and enjoy it as much as I have :)

Read on for my bartop arcade build write-up...

Read More »

My Bartop Arcade Building Mission

Here's the 'why' and what I wanted to achieve with my bartop arcade build.

First up, why? Well, I started getting into building Kodi-powered Raspberry Pi streaming boxes over a year ago, and was looking for other cool ideas for projects. As part of reading up on Kodi, I happened across a few posts in Facebook groups talking about Retro Pie and started discovering a whole retro-gaming world!

Being a 70's/80's kid who grew up with a lot of the old 'classic' consoles and arcade games (miss-spent childhood), the idea of a retro game system immediately appealed to me. Reading more, I saw a lot of people were making their very own awesome bartop arcade machines. So I started thinking. And Planning. And ordering parts gradually. And reading, reading, reading and finding elements of builds I liked.

Initially, I was thinking about building a 1-player bartop arcade with a small screen like RetroBuiltGames does - but then we have 2 very young boys who want everything the other had, so I figured I'd better go big and do a proper 2 player system. We live in Canada, and while I have a few basic tools/workspace, I don't have stuff like chopsaws, sash clamps, routers, bench drill, or even a jigsaw for that matter. Heck, I didn't even get around to building a workbench in my garage.

So I started looking around for ready-cut bartop cabinet kits, thinking it'd be way easier and cheaper than building my own, but I didn't really find much - either I didn't love the shape of it, or it was impossibe or prohibitive cost-wise to get it to Canada. Most bartop kits are sold in the US, UK and Europe so shipping and the sucky Canadian dollar knocked out buying a kit so I hunted the internet and found the Degenatron-modified Weecade plans, which seemed pretty good and what most bartop's are likely based around anyway.

I also wanted to do a few things differently to most of the kits and other bartop's I'd seen. Specifically:

  • I wanted to use a decent (20-24") sized widescreen monitor (sorry retro gaming purists), as the bartop will also run Kodi for movies/music/Youtube
  • The monitor needed to sit more upright than most bartops I saw (better for the kids)
  • Deeper control panel to accomodate admin buttons all on one panel
  • I didn't want to do t-moulding
  • Painted finish rather than vinyl (cost/time, plus i like plain/solid colour)
  • Lockable rear access door, removable not hinged
  • Didn't want to do a traditional lit marquee, or deal with acrylic/plexiglass
  • Wanted to have front-facing amplifier access for volume control (kids)
  • Single cablegoing into the cabinet with an outside 'global' on/off switch
  • Additional (easily accessible) usb connectors for usb joypads, other usb stuff

Some of these things were easy enough to accomodate, and some gave me a few headaches along the way - particularly the monitor being larger/more upright than 'normal', the front-facing amplifier and the deeper control panel - although my bartop build was mostly based on Degenatron's updated Weecade plans, most of the above broke bits of it dimensionally (couldn't use the normal speaker panel for example) so I had to do a lot of head scratching as I went.


As above, I have a pretty limited inventory of tools outside of the basic cordless drill, Dremel, sander, screwdrivers etc. I managed to borrow two bar clamps and a cordless jigsaw from a friend, and that was it. Mostly used the kitchen table as a workbench to start building the cabinet (wife was away, hopefully she doesn't read this), until it got to sanding, painting and the messy stuff!

Overall, I'm super-happy with how my bartop arcade turned out - it's not perfect, but it was a lot of fun building it, and I'm feeling pretty proud of it! People that have seen it so far have all asked "where did you order it from??" - despite that fact I say "oh look what I built"...so I guess thats a good sign :)

Notes: I followed the Degenatron modified Weecade plans exactly - the only things I did different to the plan was my cabinet was 201/8" wide (width of my widescreen monitor), and my control panel was 83/4" deep (to accomodate all admin & player buttons). For button layout I used a template from Slagcoin and modded it, more on that (and my pdf template) in Step 3.

The bartop arcade build took me just over a week from start to finish, working pretty much 10 hour days on it altogether and probably cost around $300-$400 (CAD) in total. I'll itemise the parts used and add it up later in this writeup. Why bother doing this writeup anyway? I figured putting all the information and useful stuff I found along the way could help other people, and I wanted a place to post up pics and stuff to keep everything in one place neatly and tidily :)

In the next section, I'll start writing up each stage of building my bartop arcade so scroll on down for the first steps.

Step 1: Figure out all the measurements, 'get wood' and cut out all the pieces for the cabinet.

I don't have all the tools necessary to cut everything out myself, so figured out a 'cheat' to get all the straight rectangular pieces simply cut at Home Depot

As above, I don't have a fully equipped workshop at home, so I needed to figure out how to get as much of the bartop arcade cabinet cut out at Home Depot as possible. So I sat down for a couple hours and did some figuring and wrote a list of parts. All the horizontal pieces are pretty easy, as they're the same width. So I measured the outside width of the monitor I bought (20" dead), and added 1/8" for...you know, rounding errors ;)

I worked off the Degenatron modified Weecade plans for my bartop arcade (link in the useful links section down the page), so basically used the measurements in those plans (roughly converted to inches, because Canada). The only bit I did differently was all the horizontal pieces were 201/8" wide due to widescreen monitor, and I also made the control panel quite a bit deeper than normal at 8" to accomodate all the admin buttons on the one panel. I didn't get a monitor bezel cut, as I knew it was going to be a fairly precise fit (didn't realise at this point quite how 'precise'!)


Having made my cut list, I went to Home Depot, found a single 12mm MDF sheet (9'x4' from memory, whatever the standard sheet size is anyway) and found a super helpful guy to cut everything out for me. At this point, I had all the panels ready cut to size nice and straight/square. All I'd be left to do at home myself was the tricky bit, the end panels with their curve!

Here's my cut list (in inches!), again I used 12mm MDF - out of a standard full sized sheet, I ended up with a whole 4'x201/8" spare piece, so I could if needed cut a horizontal piece out by hand if I i made a mess of something:

2 x 2' x 2' Pieces for end panels
1 x 8¾" x 20⅛" for control panel
1 x 3⅞" x 20⅛" for marquee panel
1 x 4⅞" x 20⅛" for 'speaker' panel under marquee
1 x 6" x 20⅛" for top panel (my speaker panel)
1 x 14½" x 20⅛" for floor panel
1 x 3⅛" x 20⅛" for front panel
1 x 13½" x 20⅛" for removable rear door panel
1 x 3⅜" x 20⅛" for rear bottom latch strip/power panel
1 x 6" x 20⅛" for VESA monitor panel

Note these panel measurements are also updated to reflect changes I had to make due to monitor angle, extra control panel depth and using 2"x1" batons. Depending on your monitor/monitor angle, they may not be perfect so if you copy them, do so at your own risk!

Pro-tip: For the end panels, I got two 2'x2' square panels cut. This is oversized obviously, but...if I screwed up cutting the panels, I could just go back and get a smaller sheet of 4'x2' MDF cut in half for $9 so an easy fallback.


Also picked up glue, 3/4" and 1" countersunk screws, and all the countersunk machine thread screws to hold joysticks in place. I couldn't find 1"x1" wood for the internal batons, so I just picked up some 2"x1"'s instead.

Once I got home, I set about drawing out all the measurement lines on for the end panels, exactly as the Weecade plans ready for the big 'cutting out' moment. I drew out everything on one fo the 2'x2' panels, and then when I was happy with everything and double/triple checked all of it, clamped this panel on top of the other 2'x2' sheet. (I don't even own clamps, by tpure luck my friend who lent me his jigsaw also happened to bring some clamps - they were truly invaluable!)

At this point it was actually about midnight, but being impatient I wanted to get going so I headed out into the garage with my 2 clamped MDF sheets and tried to find something to lean on. Best I could do was a garden waste bin, which was plastic and empty and not great, but anyway. I started off, slowly cutting the rear panel line, then switched to the floor line, and eventually started the control panel line...heading towards the curve. Cutting the curve actually turned out pretty dman good (I was surprised, to be honest!)

Next morning, I left the pieces clamped together, drew some rounded corners (just used a quarter coin) and sanded all the edges with my electric sander and 120 grit paper. Curves on all the corners turned out super nice, it was starting to take shape!

Next step was to start working out the positions of the batons on the inside of the end panels, and get them blued on. Again, I used the Weecade plans and measured in 18-20mm from the edges of the panel as they described. Did this all x2, and then started cutting some batons and attaching them to the first panel.

Step 2: Get the bartop arcade cabinet put together, prime, sand, paint, sand....

This is where things got a bit tricky, as it became clear I'd screwed up a bit due to the size/angle of the monitor, and the extra depth of the control panel...

Putting all the batons on either side panel was a pretty slow process, but I got there in the end. I was trying a few dry runs along the way, and it started to become clear that the extra depth of the control panel, and the more upright angle I wanted the monitor to sit at were going to cause me some issues with the panel under the marquee (normally where the speakers sit).

After much head scratching, figuring, thinking and some praying (it looked like the monitor might not squeeze in at all without reducing the control panel depth), I just went for it and figured I'd have the speakers firing out of the top rear panel instead of down towards the screen like normal, and let the amplifier into the front of the marquee. As I started to get everything glued/screwed together, I noticed the shelf under the marquee and above the monitor was going to have to get moved up a little, so then wouldn't fit depth-ways. I ended up cutting about 1" off the depth of that shelf, to get it to go in above the monitor.


I got some of the cabinet put together, and also stopped along the way to cut out holes for my 4" speakers. Stupidly, I actually hatched a plan to sit these on mounts in the cabinet so I had something extra to screw the grills into from the outside (speaker grill holes didn't match up to the speaker holes, arrrgh!). I ended up taking the mounts off and just using 3/4" screws/washers for both the speakers and grills, just mounted them at angles opposite to each other so the screws didn't hit.

Finally with everything just about fitting together, had a final test run with the monitor (got the VESA holes drilled in the monitor panel, figured out a suitable angle which was more upright and put the mounting panel in place). The larger control panel fit in, the monitor looked a good angle and I still had access to the buttons on the monitor (they're right at the bottom right front edge, I lucked out here).

At this point, I used wood filler to hide any nasty bits, uneven edge meetings, countersunk screw holes in the outisde of the cabinet. Charging ahead, I then got a quick first coat of primer on (I should have been more patent and sanded the filler first, would have been easier/better). Next morning, I got another coat of primer on and then started sanding it back with some 180 grit paper. I started out using the electric sander, but this was just too harsh so I ended up sanding the primer down by hand.

After much sanding of the primer, it was smooth and I was happy I could start painting! Wiped it all down about 200 times to try and remove any white sanding dust, laid the cabinet out on some cardboard on our picnic bench, and sprayed the first coat. Not being a spray paint expert, I made the fatal mistake of going to hard, too fast and ended up with drips and runs. After a bit of googling, I ended up just wet sanding all these runs and drips out with water and 220 grit paper (by hand!). Much pink hands later, I started spraying again. This time, nice thin even coats. Lesson learned. After about 30-45 mins, the paint had set up enough to give it another thin coat (I did this all day outside on a baking sunny 35 degree day so paint dried pretty fast).

After about 20 coats on the whole upper side of the cabinet (I chepaed out on the bottom panel with just a couple of coats as no one will ever see it), I was pretty happy with how it looked. Now its all dried, there's some spots that are glossier than other but it's plenty good enough.

Next up was to drill the control panel, prime and paint that, figure out the back door panel (I wanted it removable but lockable), and to dig a hole in the front of the marquee to accomodate the amplifier.

Step 3: Install amplifier, drill control panel, fit speakers, grills, figure out a back door panel

This is where it started to look more like a bartop arcade, and where everything got a bit more exciting as I started to install all the parts!

First order of business was to cut a very precise hole, in a very exact position in the marquee area of the cabinet so the amplifier would sit in there seamlessly and be fully accessible to the users. I didn't actually take pictures of this hole as it evolved, but it was pretty horrid and nerve-wracking as I was cleverly digging out this hole in my now mostly built cabinet, so a screw up would have cost me big time.

I did a lot of measuring, and figured out the exact spot and the exact size - due to the face of the amplifier I used, I had no margin for error. Also the amp case was ridged so not a perfect fit to a precise edge (had I managed to cut one!), so I did the best I could with a drill and jigsaw, then sanded out gradually with my dremel until the amplifier just squeezed in. I also had to machine off part of the casing for the amp so it would fit through the hole to be flush with the outside of the marquee.


Hole cut and amp fitted, I filled the gaps around the edges with wood filler, sanded and painted before reassembling the amplifier guts in situ. I still have access to the amp and speakers should I need it via the rear access panel (lucky bit of 'planning'). The speaker grill surrounds I painted red and left the grills silver. Gave a nice look.

Next I cut the button holes in the control panel. I wanted 20 in total, plus the joystick holes. I decided to replicate the button setup that Game Room Solutions does in its cabinets, for one it seemed a sensible setup, and for two they had a fully written tutorial on how to set up all those buttons in RetroPie. I was doing it slightly differently as I wanted all the buttons on the control panel, no admin buttons on the front panel, just for neatness and ease of assembly.

I found the button templates at SlagCoin, and played around with them in photoshop until the layout was even-ish (I did this at real life size), then printed out at real size on a couple of sheets of A4 paper (see below for example image and link to pdf file). I carefully taped the paper onto the control panel, making sure it was all square/in the right place, and the starting drilling out the holes with a 11/8" spade bit in my cordless drill. Sanded a bit, primed, sanded and then painted the panel. Jumped ahead and fitted the Zippyy joysticks as well at this point, just bolted them in using bolts nuts and locking washers I picked up at Home Depot.

Here's a jpg of the control panel layout:

bartop arcade control panel layout

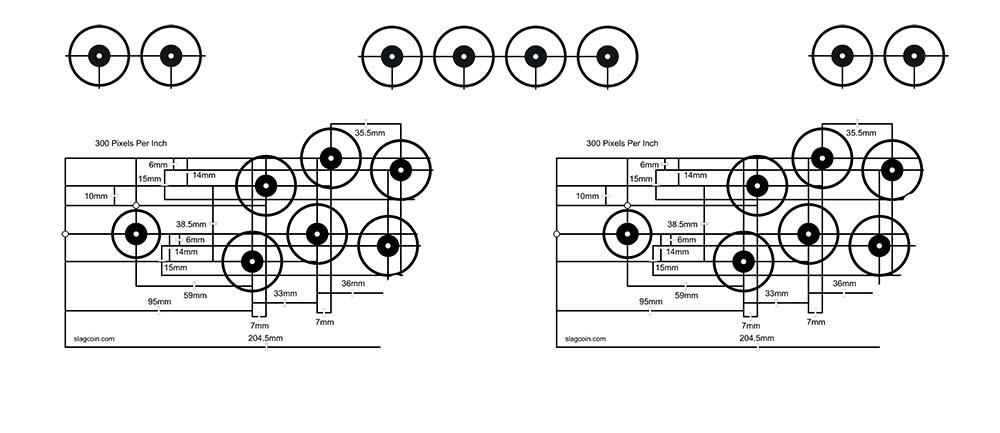
Download the full-sized bartop control panel layout pdf file here. 3mb, .pdf - it has the orginal photoshop layers still editable if you want to move something around!

I was going to leave the panel just painted red, but I couldn't get the paint finish quite perfect and it was all starting to look a bit 'red' so I actually ended up wrapping the control panel in some nice 3D carbon fiber vinyl I picked up at the last minute from Canadian Tire. I have over half left, but I'm glad I wrapped the panel it was $20 well spent.

I now had the monitor fitted (I over-sized the VESA mount holes to give me some wiggle room if needed), the amplifier and speakers and grills. I wired the amp at this point just to test if it worked! Also powered on the monitor I bought for the first time. Luckily everything worked fine :)

At this point I had another test fitting, just to see if everything was going to squeeze in...but after painting, it seemed like everything grew a few mil so the control panel wouldn't fit in, nor would the partially made back access panel. A few minutes of sanding with some 80 grit paper and it was all good again!

Next step was to install the buttons, and figure out wiring them to the Xin-Mo usb controller, then hook everything up to my Pi 3!

Step 4: Get everything in the bartop, fit the back door, wire it up, fire it up!

The hopefully final stretch of what was starting to feel like a bit of a marathon - getting the back access panel fitted, all the buttons wired up and tested, and finally give it a test-run!

Next up was figure a lockable rear access panel for the cabinet to keep curious minds (and fingers/food/toys/etc) out! I actually screwed up or something went wrong, because the wood panel I had cut that was supposed to be the rear panel, was actually a few inches too short. I'm pretty sure I gave the Home Depot saw guy a wrong measurement. As it turned out, this worked out fine for my plan of a removable panel.

I cut a panel and attached it at the bottom rear of the cabinet opening, from memory it was about 3" high - basically the shortfall on what should have been the back panel I had cut. Then I fitted a couple inch scrap piece of MDF to the bottom inside edge of my removable panel piece - so it formed a lip. No need for hinges :)

At the top of the removable panel, I made a mess of measuring where the lock should go, drilled the hole and fitted the little desk lock I got for the job. After much messing around, and yet more head scratching, I ended up with a tiny piece of wood glued and screwed inside the cabinet for the lock to latch on. It's a tight fit, but works perfectly. I made such a mess of measuring where the lock should go, I even ended up having to grind about 1/2" off the lock latching piece with the Dremel. Anyway, moving on ;)


Rear panel fitted, next up was to make a little hole in the rear of the cabinet to fit a switched single power inlet - this would allow the cabinet to be switched on/off with a single switch outside the cabinet so great for both neatness and practicality. The inlet would just be wired to a 4-way adaptor inside the cabinet that would power everything like the monitor, Pi, amp and anything else I might need.

Fitting the inlet went surprisingly nicely after my harrowing amplifier fitting experience, nice fit, edges of the inlet are big enough to hide any sins ;) Hole dug, I had to figure out how the hell to wire the inlet and switch to the power bar inside the cabinet. Of course coming direct from China it was super cheap, but didn't include something as useful as a wiring diagram...After some googling I found one photo a guy had taken of much the same inlet wired up so I crossed finegrs and copied that. A nervous bit of testing and happily it worked first time!

All this done, it was time to wire up the buttons. As I said earlier, I was replicating the full 20 button layout that Game Room Solutions uses on their bartops, and they have both a blog post and a video describing very fully and helpfully how to do it using a Xin-Mo usb controller. So, I just followed the video and got everything wired pretty easily. Tested with the whole panel hooked up to my PC and found I had one joystick up/left mixed up, so fixed that easily and job done!

Having all the buttons on just one panel was a good decision as it meant I could get the wiring pretty neat, and I attached the USB controller to the underside of the panel, meaning its fully self contained. Easy for maintenance should I ever need to fix anything. Got the wires all pretty neatly bunched and tied up, and slotted the panel in. Nearly ready for lift-off!

I had already (in super-eager impatience!) burned a RetroPie img to the 64gb Sandisk sd card I bought, and configured the buttons as mentioned above. I didn't put too many rom's on it at this point, as I'd always planned to use a 128gb usb memory stick to store rom's on. With much fanfare and having double checked everything, we booted up for the first time...and everything worked fine!

Step 5: A few extra enhancements, and the lessons I learned...

Since the first boot and getting everything working, I've made a few improvements and done some extra finishing work. Also learned a few lessoons along the way.

In finishing up, I did a few little extra's - like fitting heatsinks and a 5v 40mm cooling fan to the Pi 3 - I'm not overclocking, but the Pi does get pretty warm so I figured better safe than sorry. I also mapped out a grid of vent holes and drilled them on the back panel. This adds a nice extra 'pro' look, and shold let some air circulate inside the cabinet.

I've now added a full stock of game roms, although I did cut down a bit - and installed Kodi so the kids can use the bartop as a Youtube dance party machine as well as for gaming.

Learned a few lessons along the way. Namely:

Don't rush things - I cost myself time and caused myself headaches because I'd gotten ahead of myself in places, and I did stuff later (like cut the amp hole) that I should have done earlier.

Little and often for spray painting. I went a bit gung-ho first off, and ended up having to do a lot of wet sanding to erase my drips and paint runs. Thin coats all the way!

Buttons, use a colour mixture for little people! My friend actually gave me this idea, I was going to do all one colour for the player buttons - but he suggested using different colours as it's easier to should at some one small 'hit the blue button' than 'hit the red one top row, to the right...no right...no, the other right!'. He was right, and having a mix of colours has proved a really excellent choice.

If you make mistakes, don't panic - I made lots, and a bit of time and thought enabled me to get around each obstacle nicely in the end.


I sort of wish I bought a better quality amplifier and speakers. I can't really complain due to the low price I paid, but I'm a bit of an 'anorak' for sound quality and have owned some amazing hifi equipment over the years. The amp and speakers are adequate for the gaming side of things (just), but woefully damn awful mostly for even youtube music video's via Kodi. This would partly be the fault of the audio source as well, as I'm feeding the amp from the 3.5mm audio jack on the Pi.

I'm glad I did a deeper control panel and fitted everything on the one panel - made life a lot easier, and also glad the monitor I bought has it's buttons in an accessible place right on the front bezel.

Overall, I'm super happy with how the bartop arcade build turned out - it does look visually great, (for my tastes anyway), and it works great as well. Having Kodi within RetroPie is an added bonus that extends the usefulness for us a lot.

Thanks for reading this far, read on for useful resources, video's I found helpful in my building process and a full parts list/costing.

Bartop Update! Fitted a 4-port usb hub, more carbon fiber, some new pics!

Just a little update, added a 4-port usb hub to the front panel, and wrapped that panel in carbon fiber plus took some better pics of the completed project.

I'd always planned to add a usb hub to the bartop arcade, and ordered a tiny 4-port one ages ago - it finally arrived yesterday! I figured it would be a useful addition, as we could then play games using snes usb joypads, play 4 player games and just be able to use usb stuff like my little wireless keyboard easier than opening the back up.

The place I wanted to put the usb hub was always through the front panel, and that's where it ended up but I ended up wrapping the panel in carbon fiber as the finished paintwork chipped as I dug out the hole (and I was too lazy to fill/sand/paint again!)

The usb hub I got was a lot tinier than I'd imagined (common problem if you've ever ordered stuff from Ali Express), and the case for it was totally smooth. This was going to be tricky, and I didn't really have a fool-proof plan on how I was going to secure it in place.


Not one to let small details like that hold me back, I cracked on and measured up and then bored out a little 3" long slot for it right at the bottom of the front panel, with my trusty Dremel and a drill-type cutting bit. A lot of stress, sweat (hot day here again) and mdf dust and I had a reasonably neat hole cut that was actually for once a nice, snug fit. Luckily I'd realised that the front panel was angled, so I'd need to put the hub through the hole angled so it fit flush.

The fit was pretty tight so I left it at that, and made a little wedge-seat piece from some scrap mdf and glued the whole lot in place. I don't think it's going anywhere. The downside of grinding out this slot for the hub, was the finished paint chipped a bit (quite a bit) around the edges of the hole. Some head scratching later, I decided to take the easy way out and just wrapped the whole front panel in carbon fiber. It looks pretty good, now it matches the control panel.

After the hub was all in place and connected, I reassembled my bartop rcade cabinet, (super glad I have a large access door and also did all the buttons just on the control panel so it's easy to remove/work in the cabinet) and took some better pictures of it completed outside. I've added those to the bartop arcade gallery page already, so check them out!

Also congfigured the two snes usb joypads I got a while back (they're not on the parts list, but they were $2.50 each, free shipped, from Ali Express), and it was surprisingly easy in Emulation Station, just went to 'configure controls' in the menu, and set each pads buttons up as normal. This thankfully didn't interfere with the existing xin-mo arcade controls I have set up, and ES appears to be remembering the joypads fine, so looks, in the words of esteemed tv personality Borat, "great success".

Hopefully, I can resist doing anything else to my arcade now and just play some games ;)

My RetroPie Bartop Arcade Build Parts List

Here's a full (from memory at least) parts list. I've included prices, but obviously YMMV as prices change often. Prices are USD unless specified, most parts I bought from Ali Express as they're a lot cheaper than buying in Canada. Various bits and pieces I also bought from Amazon US as I had some gift cards to use up. All Ali Express items were free shipping - some arrived very fast like 10-14 days (look out for Ali Express items shipped by e-packet), others took 2 months via regular mail.

Part NamePrice PaidLink/Store Bought
Acer 21.5" Monitor$154CADWalmart
Raspberry Pi 3$36Amazon
20 Arcade buttons, inc switches, various colours$26Ali Express
Pair speaker grills$4Ali Express
Desk lock assembly$1.60Ali Express
Xin-Mo style USB controller inc wiring harness$19Ali Express
Carbon fibre vinyl wrap 4'x2'$22CADCanadian Tire
12mm 9'x4' sheet of MDF inc. cutting$25CADHome Depot
Gorilla glue$4Amazon
3/4" & 1" #6 & #8 woodscrews, pack of each$8CADHome Depot
Various small nuts/bolts/washers for joysticks$6CADHome Depot
Male/Male 3.5mm audio cable$1.20Ali Express
3 Cans high gloss red Rust-oleum spray paint$10Amazon
DVI to HDMI adapter cable 1m$1.80Ali Express
Pair Zippyy joysticks$15Ali Express
Pair Red bat-style tops for above$12Ali Express
5v 3a Power supply for Pi$4Ali Express
Pair no name 4" Car speakers$15Ali Express
Lepy audio amplifier$8Ali Express
12v DC Power supply for amp$2.80Ali Express
4-Way mains adapter inside cabinet$0Free - Already Owned
Female wire terminals for power inlet$5CADCanadian Tire
300 Cable ties (I used about 10)$4Ali Express
VESA mount screws/washers$0Free - Already Owned
Can of primer$0Free - Already Owned
80/120/180/220 Grit sand paper$14CADHome Depot
Power inlet with switch$1.08Ali Express
Wall plug/cable for above$2.20Ali Express
Elmers Wood filler$5CADAmazon
Squeegee for applying vinyl/wood filler$0.38Ali Express
64gb Sandisk ultra micro SD card$18.99Amazon
128gb Sandisk ultra USB memory stick$35Amazon
5v 40mm fan for Raspberru Pi (pack of 3)$4Ali Express
4-port usb 3 hub (not powered)$4.80Ali Express
Male-female usb extension cable, 50cm$1.67Ali Express

For tools, I used the following. I didn't buy anything tool-wise, I used whatever I already owned and was lucky enough to have a friend loan me his jigsaw, spade bit set and two bar clamps. The only thing that would have made life a bit easier was another pair of hands, and some wider cramps to hold things together. Oh and some sort of work becnh would have been useful, plus maybe a soldering iron in places. I used mostly our kitchen table and our picnic bench outside for the messy bits:

Cordless drill, jigsaw, electric sander, wire cutters/stripper, screwdrivers, various drill bits, 1" and 11/8" spade type drill bits, 2x bar clamps, small paint roller for applying primer, dremel tool and bit set.


Links to Useful Bartop Arcade Building Resources

The following links were very useful resources in my retropie-powered bartop arcade building project.


Some Awesome Bartop Arcade Video's I Found Really Helpful

I spent a lot of time on Youtube watching oretty much every video about building a bartop arcade on there. These are the ones I found most useful!

Bartop arcade build from Geek Pub
Building a mini jamma arcade machine from Retrobuilt Games
Putting together a pre-cut bartop arcade cabinet from Retroactive arcade
Gameroom Solutions button wiring guide (I followed this exactly)
Another great Xin-Mo style controller button wiring video from Ultracabs
Full playlist of good arcade building stuff including the video's here:

Don't forget to check out my full bartop arcade build photo gallery - click here!